


7 Steps to Install Cabinet End Panels

Last Updated: October 30, 2026
Quick Summary
Install cabinet end panels by measuring the cabinet box, cutting the panel with a scribe allowance on wall and floor edges, then clamping it flush with construction adhesive and driving 1-5/8 in screws from inside the cabinet. Fastening from inside hides every screw head on the finished face.
- A 1-5/8 in screw passes through a 3/4 in panel without breaking the cabinet interior surface.
- Leave 1/8 in to 1/4 in of extra material on edges meeting a wall or floor, then scribe to fit.
- Space screws about 6 in apart and stop when the head sits just below the interior surface.
- For 1/4 in applied skins, use 3/4 in to 1 in brads and rely on adhesive for holding power.
- When installing after cabinets are anchored, use a temporary cleat to hold the panel while adhesive sets.
Table of Contents
- Tools and Materials You Need Before You Start
- How to Measure and Cut Cabinet End Panels
- How to Attach End Panels to Kitchen Cabinets
- Panel Installation by Cabinet Construction Type
- Installing Cabinet End Panels After Cabinet Installation
- Freestanding Cabinet End Panel Installation
- Troubleshooting Common End Panel Problems
- Choose Your End Panels and Plan Your Project
- Frequently Asked Questions
Tools and Materials You Need Before You Start
Installing cabinet end panels turns a row of boxes into finished furniture, and the right tools make it a one-afternoon job.
Gather these before you touch a panel:
- Tape measure and a pencil
- Straightedge or a 1.2 m level
- Circular saw or table saw with a fine-tooth blade
Screw length matters: a 1-5/8 in screw passes through a 3/4 in panel into the cabinet box without breaking the surface.
Skipping the clamps is the most common shortcut, and it produces a crooked panel. Clamps hold the panel flush while the adhesive sets and keep your hands free.
How to Measure and Cut Cabinet End Panels
A cabinet end panel is a flat piece of finished material that covers the exposed side of a cabinet, and it must match the cabinet's actual dimensions, not the spec sheet. The goal: flush at the front, level at the top, tight to the wall or floor at the back and bottom.
Measuring Height, Depth, and Width
Measure the cabinet box itself, not the door. Record three numbers and write them on the back of the panel before you cut:
- Height: from the floor or the cabinet's bottom edge to the top of the box. On base cabinets, measure at the front and back of the box; floors and ceilings are rarely parallel, and the difference tells you how much scribe you will need.
- Depth: from the front edge of the cabinet frame to the back wall. Measure at the top and bottom of the box, because walls lean.
- Width (panel thickness): usually 3/4 in for standard cabinet panels, but confirm with a caliper or tape. Some skins are 1/4 in and are applied over an existing side, which changes the fastening method entirely.
Add your door thickness to the depth if the end panel will sit flush with the closed door face. For a framed cabinet with a 1/2 in overlay door, the panel front edge typically sits proud of the face frame by the door thickness minus the overlay; for a full-overlay frameless cabinet, the panel depth equals the box depth plus the door thickness.
Cut Allowances and Door-Overlay Considerations
Cut the panel to the measured height and depth, then add a scribe allowance on the wall side and the floor side.
Door overlay changes the front-edge treatment. On a framed cabinet, the panel front edge is usually flush with the face frame, and the door overlays both. On a frameless cabinet, the panel front edge aligns with the door edge, so the panel depth must include the door thickness.
Marking, Trimming, and Test-Fitting
Mark the panel on the back face with a pencil and straightedge. Cut with the good face down when using a circular saw, so tear-out stays hidden, and support the offcut so the panel does not pinch the blade. Use a fine-tooth blade.
Then test-fit before you fasten anything. Hold the panel against the cabinet and check three things: the top edge lines up with the cabinet top, the front edge sits flush with the frame or door edge, and the bottom clears the floor by the same gap as the neighboring cabinet.
Woodworking tips on cutting plywood panels cleanly
How to Attach End Panels to Kitchen Cabinets
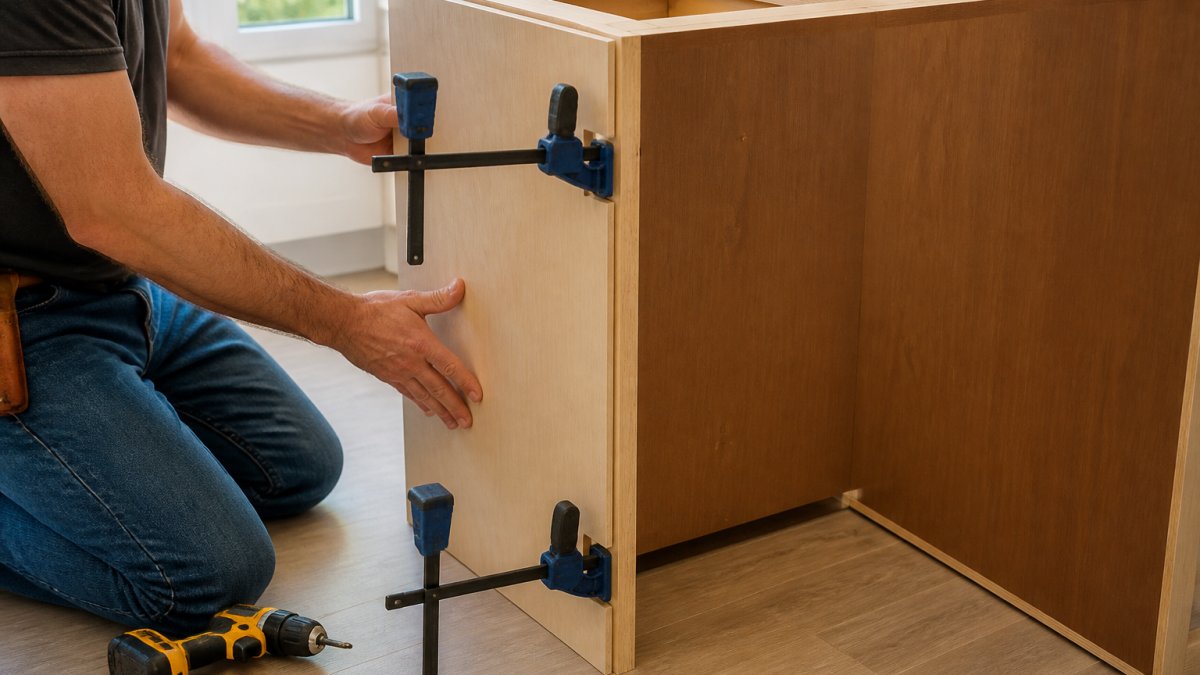
Attaching an end panel comes down to three moves: clamp it flush, drill pilot holes, and fasten from inside the cabinet where the screws stay hidden. This is the method we recommend for anyone learning how to attach end panels to kitchen cabinets for the first time.
Clamping, Pilot Holes, and Fastening From Inside
- Run a bead of construction adhesive along the cabinet side where the panel will sit. Keep the bead about 1 in in from the edges so it does not squeeze out onto the finished face.
- Press the panel into place and clamp it at the top and bottom. Use spring clamps or bar clamps with pads so the jaws do not dent the finish.
- Check flush again with your straightedge and a 1.2 m level; clamp pressure can shift a panel.
- Drill pilot holes through the cabinet's interior side wall, spaced about 6 in apart. Use a bit sized for the screw shank, not the threads, so the panel pulls tight without splitting.
- Drive 1-5/8 in cabinet screws from inside the box into the panel. Stop when the screw head is just below the cabinet interior surface; overdriving crushes the panel core.
- Wipe any squeezed-out adhesive immediately with a damp cloth before it skins over.
Fastening from inside means no visible screw heads on the finished face. That single detail separates a professional-looking install from a DIY one.
Fastening by Cabinet Construction
- Framed cabinets: the face frame gives you a solid edge to register the panel against. Fasten through the box side into the panel, and add a screw through the face frame edge into the panel front edge if the frame is wide enough. Watch for the panel sitting proud of the frame when the door overlay is deep; test-fit with the door hung.
- Frameless cabinets: there is no frame to hide behind, so the panel must align exactly with the door edge. Adhesive plus screws from inside is the standard approach, and a cleat at the bottom helps hold alignment while the adhesive sets.
- Finished ends and applied panels: a 1/4 in skin applied over an existing finished side is fastened with adhesive and short brads or finish nails rather than cabinet screws, because a long screw will punch through the cabinet interior. Use 18-gauge brads long enough to grab the skin but not the box interior.
Fastener Selection and Trade-Offs
A 1-5/8 in cabinet screw passes through a 3/4 in panel into the cabinet box without breaking the interior surface. Longer screws split the panel or show inside the cabinet; shorter ones never grab.
Construction adhesive does the long-term holding; screws or nails mainly clamp the panel until the adhesive cures. A common pattern is a bead of construction adhesive plus screws every 6 in to 8 in, which balances holding power against the risk of splitting a thin panel.
Scribing Panels to Uneven Walls
Walls are rarely straight, and a panel that meets one needs a scribe. Set the panel in place, then use a scribe tool or a pencil taped to a small block to trace the wall's contour onto the panel. Cut just outside the line and test-fit again; a small gap can be closed with trim. Scribe before you fasten, once the adhesive sets, the panel is not moving.
Panel Installation by Cabinet Construction Type
| Cabinet Type | Panel Sits Against | Fastening Approach | Watch For |
|---|---|---|---|
| Framed | Face frame edge and box side | Screws through the box side, flush to frame | Panel proud of frame if overlay is deep |
| Frameless | Full box side, no frame | Adhesive plus screws from inside | Panel must align with door edge exactly |
| Base cabinet | Box side down to floor | Cleat at the bottom for support | Toe kick alignment |
| Upper cabinet | Box side, open below | Screws from inside only | Bottom edge must be level |
Decorative panels get their own treatment. Readers dealing with a dishwasher opening can find the dishwasher end panel that fits that application. If your cabinet style calls for a raised or shaped end, the tall decorative end panel and base decorative end panel options match the door profile so the finished side looks intentional rather than added on.
Installing Cabinet End Panels After Cabinet Installation
Installing cabinet end panels after cabinet installation is done is common, and it works fine. The cabinets are already anchored, so you are not fighting a moving box.
The trick is access.
Expect this to take longer than a pre-install panel, especially reaching into upper cabinets; have a helper hold the panel on tall uppers.
Cabinet installation guidance from the National Kitchen and Bath Association
Freestanding Cabinet End Panel Installation
Freestanding cabinet end panel installation applies when the cabinet's side is fully exposed, such as the end of a run or an island.
Build a support cleat first. Screw a strip of 1x2 to the floor and to the cabinet's back edge, set back from the finished face by the panel's thickness.
For a clean finished end, pick an end skin that matches your door style. The Dover cabinet end skin is a cabinet end skin available at $82.00.

Troubleshooting Common End Panel Problems
- Panel sits proud of the frame: your depth measurement missed the door overlay. Re-measure with the door closed and trim the panel.
- Gap at the wall: the wall is out of square. Scribe the panel or cover the gap with matching molding.
- Screw head shows on the finished face: you fastened from the outside. Back the screw out, plug the hole, and refasten from inside.
Safety matters here too. Wear eye protection when cutting, and keep clamps off finished floors by setting panels on a moving blanket.
Choose Your End Panels and Plan Your Project
The panel you pick decides how the finished kitchen reads. A flat skin disappears into a modern run; a decorative panel adds profile where the cabinet side is on show. Get the type right and the install is straightforward.
Frugal Cabinets Online offers end panels and skins, including the Dover, FC Shaker, Yarmouth Slab and Trenton Slab options listed below. Our ready-to-assemble cabinets are built for on-site assembly.
Frequently Asked Questions
How do you attach end panels to kitchen cabinets?
Clamp the panel in place first so it stays flush with the cabinet frame, then drill pilot holes and drive cabinet screws from inside the cabinet through the side panel into the end panel. For a finished look, add finish nails or adhesive along the front edge. Always check alignment before fastening, and use screws short enough that they will not break through the outer face of the end panel.
Can you install cabinet end panels after the cabinets are installed?
Yes. Installing cabinet end panels after cabinet installation is common, especially on remodel projects where cabinets go in first. You will need to measure the exposed side carefully, cut the panel to fit around countertops or crown molding, and fasten it from inside the cabinet where access allows. A helper or clamp makes it easier to hold the panel flush while you drive screws.
Should cabinet end panels be flush with the cabinet doors?
In most kitchens, the end panel should sit flush with the cabinet frame, not proud of the doors. If your doors have a decorative overlay, some installers set the panel slightly forward so its edge lines up with the door face for a cleaner finished end. Check your door overlay before cutting, and test-fit the panel before fastening.
What adhesive or fasteners should you use to attach cabinet end panels?
Use cabinet screws long enough to bite into the panel but short enough not to break through, plus finish nails along the front edge and a bead of construction adhesive or contact cement for a tight bond. Drill pilot holes to prevent splitting, and clamp the panel while the adhesive sets. For freestanding panels, add a cleat at the floor and wall for support.
The hardest part of end panels is not the install. It is ordering the right type and quantity the first time. Frugal Cabinets Online offers premium ready-to-assemble cabinets with matching end panels, free design help to map your layout, and flat 50% off on premium cabinets. Get started with Frugal Cabinets Online and finish your kitchen with panels that look built in, not bolted on.


